


Hi everyone! Missed you. So glad we are back together because man, was I overwhelmed by the love last week when I revealed my living room and cannot tell you how much it meant to me. Are you ready to see my sweet little kitchen I teased in the intro (also head there for befores)? That’s her at the end there! With this one, I had some challenges. Challenges that are EXTREMELY relatable to most renters, I think. Because in a living room or bedroom, you can paint the walls, switch out the lights and hang art to make it feel totally new. BUT in a kitchen (and bathroom), there are typically less than attractive permanent materials that, without involving construction and $$, you must live with. My kitchen had two things going for it, though: That open shelving (hey pretty!) and enough space for a dining nook (what?!). However, there were three things that were a thorn in my side: The floors (that I begrudgingly embraced), the countertop and a broken refrigerator. (Fun fact, my lease stated that my landlord wasn’t required to provide appliances, so it was on me to figure this one out…I asked).
My mind started spinning with ways to functionally rectify these visual “wrongs.” I started with the fridge as that was the most pressing. Or so I thought…
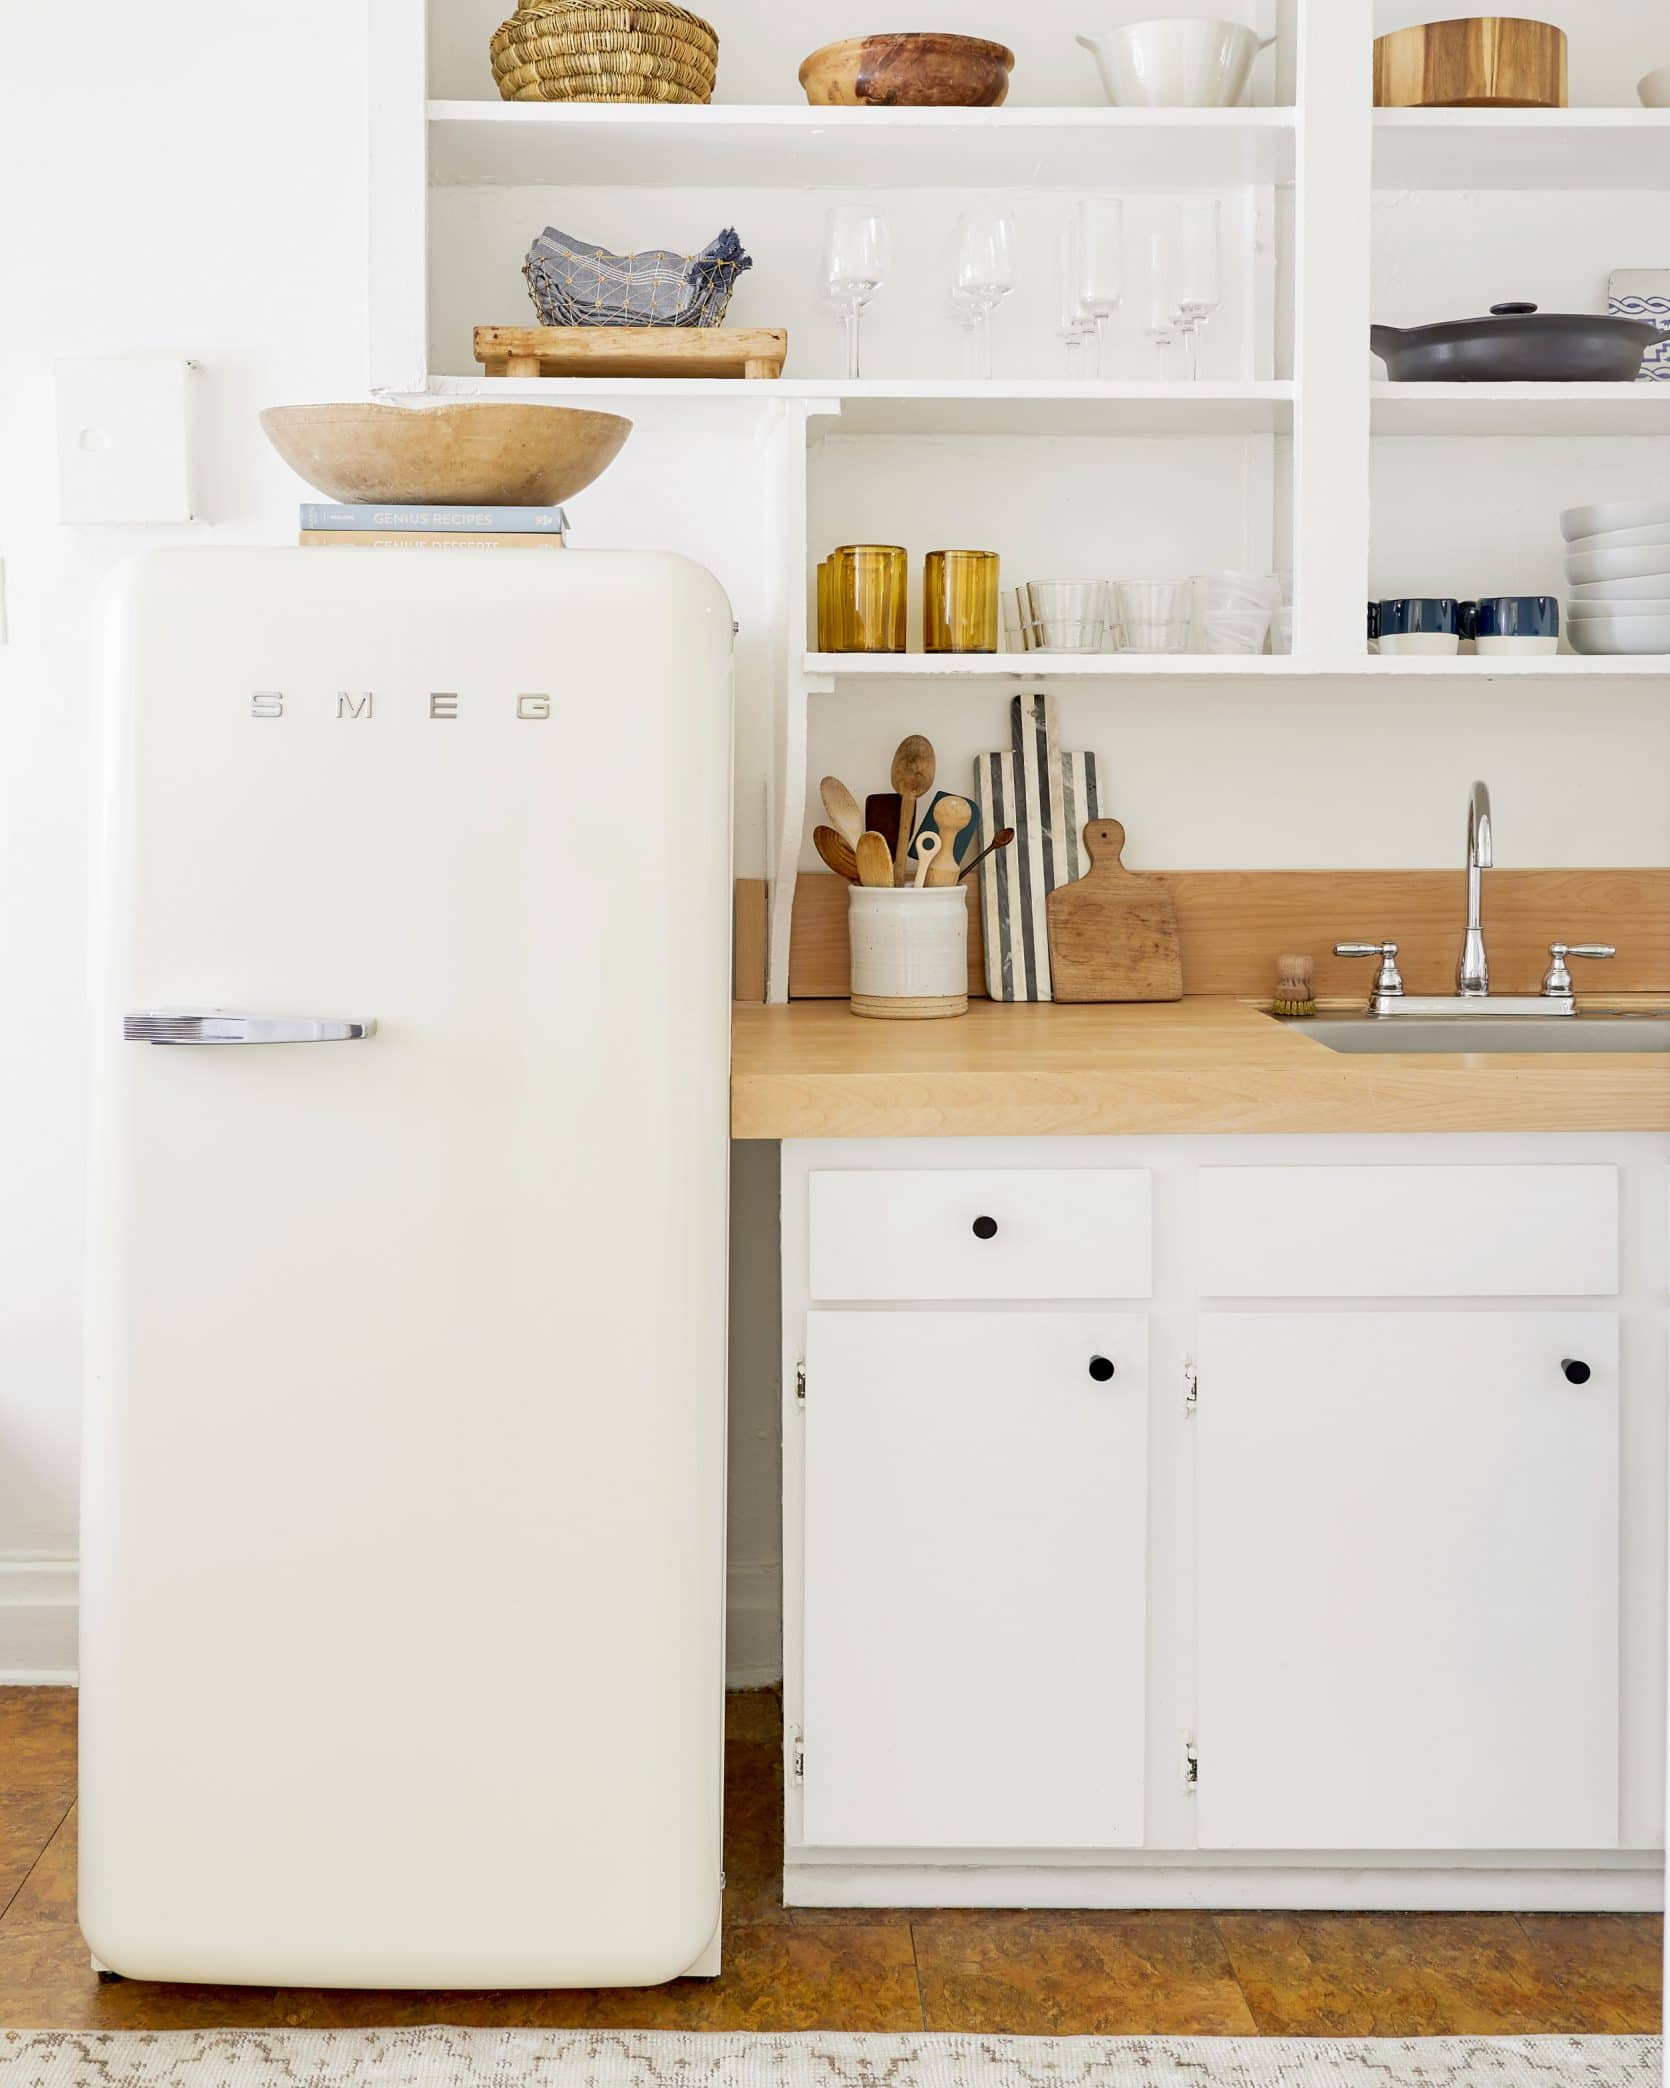
Smeg Fridge | Cabinet Knobs | Recipe Book | Dessert Book | Top Shelf (left to right): Woven Bowls | Wooden Bowl (vintage) | Striped Porcelain Bowl | Wooden Bowl | Second Shelf (left to right): Gold Knot Basket | Napkins (no longer available) | Wine Glasses (no longer available) | Champagne Flutes
Now, there were a couple of restrictions. Obviously, as you can see from the photo, it couldn’t be a tall fridge because of my shelving overhang. So what started out as something SO exciting (the opportunity to display beautiful kitchenwares) became a real burden, real fast. I was left with about two options for refrigerators I didn’t hate that I found online. The other rather obvious other issue was that it couldn’t take up a lot of my precious square footage. I had my breakfast nook to consider! Well, I ended up living with said broken fridge until TWO WEEKS before the shoot. Whoops. I just kept putting it off. It ended up not feeling that pressing since I only kind of cook. I’m trying to cook more but I wouldn’t say I love it. Plus, who really wants to spend money on a fridge they know they aren’t going to love?? (I’m raising my hand).
Then, another serendipitous thing occurred. You may have noticed that that pretty Smeg looks an awful like the one from Velinda’s tiny kitchen reveal. Good eye! It is the EXACT one. There was a bit of a miscommunication and a fridge that opened on the wrong side was sent to Velinda. Smeg, being the wonderful company that they are, sent her the correct one. But the wrong one wasn’t picked up right away, so I thought maybe they might consider letting me keep it and then they wouldn’t have to deal with shipping. They said yes (!!!) and I got the fridge I always dreamed of having. Guys, there is a wine rack inside. Guys, an ACTUAL wine rack to help secure my already strong bond with the Trader Joe’s wine section.

Top Shelf (left to right): Black Wood Vase | Scalloped Neck Pitcher | Blue Handled Vase (vintage) | Pom Mug (similar) | Marbled Vase | Glass Pitcher | Tall Blue Vase | Amber Glass Vase | Paper Vase
That is the only thing in my kitchen that was gifted (I like being upfront about these things). Everything else came straight out of my ever-shrinking wallet. But we are not going to think about that because we have the rest of the kitchen to discuss. 🙂
The easiest change I made was switching out the cabinet knobs. But the first real kitchen “DID” (Do-It-Dad, as a commenter from last week’s reveal VERY accurately coined) was this alder plywood countertop inspired by Sarah Lonsdale (Remodelista co-founder). If I had only been able to change one thing in my kitchen, it would have been this countertop. It updated the entire space instantly and completely. Now, because I am historically a form-before-function gal, I did not heavily seal this bad boy because I wanted to keep the wood looking as natural as possible. I—i.e. not my dad—used a water-based matte wood seal to protect the wood. Two coats if I remember correctly. I was heartbroken that I had to change the wood at all because I loved its natural state but I knew it would be destroyed within a day of me using it if I didn’t so it wasn’t an option. Also, remember last week when I said “I was careful but not crazy neurotic” about my white sofa? Well, I’m a neurotic nut when it comes to water on that countertop. As soon as I’m done washing my dishes (and periodically during), I quickly wipe up any and all water that dares to touch its holy surface. I should just put another coat of seal on it. But doooo I?
Okay, let’s get into the basics of the construction. I interviewed my dad to re-remember how he accomplished his amazing feats (both the construction and annoying daughter opinions). I thought this might be helpful in case some of you are really handy and would like to do the same. FYI these are just basic guidelines and some construction common knowledge is needed:
1. Listen to daughter then promptly ignore her.
2. Measure existing countertop and sink opening.
3. Cut the main piece of 3/4″ alder plywood to counter size and then use a router tool to cut out the sink dimensions.
4. Cut desired size of front lip and miter the front edge of the countertop and front lip piece together. TIP: Mitering will take away 3/4″ of your original depth measurement. So add that in when you are measuring.
5. If desired, make a freestanding backsplash (mine nicely sits on top of the old backsplash).
6. Seal wood with a water-based matte finish. Follow the directions on the can.
7. Use clear silicone to seal counter overlay to sink and backsplash to the countertop. (I have been assured by my dad that it will easily peel off my metal sink if I have to take it off when I move. You just definitely do not want any water to get under the counter where things like mold could grow.
8. Enjoy while your daughter is crying tears of joy.

Top Shelf (left to right): Pink Carafe (unavailable) | Glass Jelly Vase | Abstract Vase | Second Shelf (left to right): Two-Toned Ceramic Bowl | Open Weave Basket | Bottom Shelf (left to right): Black Skillet | Wine Decanter | Cookbook
Oh hey shelves! My shelves were kinda an unexpected challenge. Mainly because I am one single person that can only comfortably seat four people for a meal and simply doesn’t need a ton of plates and glassware. Everything I needed for everyday life could fit on two shelves, so what was I going to do for the other ones? I first thought maybe wine but sadly my place doesn’t have the best temperature control so it gets both really hot and super cold. Long story short, I had been saving this perfect bottle of red for about a year and when I finally decided to drink it, it was corked. I’m not totally over it yet. So wine was out. What’s the next best thing? A beautiful collection of vases and pitchers. I had an unhealthy amount of fun buying vessels I may or not ever use for their actual purpose. Some are Target, some are IKEA, then a sprinkling of Zara, West Elm, Etsy, foreign makers and vintage. I love them because they are beautiful and make me happy, not because I need them for everyday use. Same goes for the next shelf down.
Since the top row was colorful and patterned, I got the advice from expert EHD stylist Emily Bowser that I should go neutral. Clearly, she was right. Finding bowls and baskets that were narrow, yet tallish (that I liked) was not super easy but I succeeded. I love all the pieces I found. But full disclosure: That really cool vintage one on the far left is Emily’s (Henderson) and I will have to replace it. Unless…would she really notice if I don’t give it back??…just kidding, I will give it back…maybe.

Bottom Shelf (left to right): Coffee Mug (no longer available) | Pasta Bowl | Dinner Plate | Cereal Bowl | Countertop: S & P Shakers | Art (vintage) | Vinegar Decanter | Oil Decanter
Let’s take a minute to talk about the things I actually use like the plates and bowls. I found these at West Elm only about a month ago. Me, procrastinate? But I seriously cannot sing their praises any louder. They look handmade, are sturdy AND are dishwasher safe. Not that I have a dishwasher but a girl can dream. I bought six of each because I plan to have them for a long time and will maybe someday live in a home that seats six people (right?!?). I chose the plates and cereal bowls in white and the pasta bowls in gray (which has a very pretty light blue undertone). I love mixing up dinnerware sets with either different colors or totally different collections. It helps to keep your shelves and meals looking interesting and collected. Like how I have different mugs. I got these from the wonderful store I worked at during my short stint in Australia called Lily and The Weasel in Melbourne. Hi Sue! The mugs are from the Australian ceramic company Robert Gordon, which I believe is now also sold in the US.
Like in my living room, I had to get some vintage art into this kitchen. One thing I have found is that art is the easiest thing to collect when you travel, particularly when it’s small. Like those tiles. They’re from a Madrid flea market when I was in Spain after walking part of the Camino de Santiago with my family and that little painting I got for $20 at the Melrose Flea Market a couple of years ago. Serious scores that I treasure.
Now a super easy and affordable way to add some style to your kitchen is with cute oil and vinegar decanters. These weren’t crazy expensive and they add a modern accent to the countertop. It was getting a little too casual until I added those. FUN FACT: I got that marble tray for Christmas and despite my bubble wrapping attempts, it broke on both ends during my flight. But when I looked at it broken, I thought it looked cooler. Happy accident.

Bottom Shelf (left to right): Amber Glass (similar) | Short Water Glass | White Glass (no longer available) | Countertop (left to right): Ceramic Canister | Light Spreading Knife | Wood Spatula (similar) | Rubber Spatula (similar) | Striped Marble Board (similar) | Wood Board (vintage) | Brush
Bottoms up! It’s glassware time. I wanted simple but textured, like most everything in my apartment.
Let’s start with the tall amber beauties that I got on my 30th birthday trip with my best friend to Guadalajara, Mexico. They were so reasonably priced, the amber tone was perfect and they are thick. This is great for my incurable clumsiness and added necessary color. Plus, when I look at them, they remind me of one of my favorite trips and personalized the space in a functional way.
To the right of those are great and inexpensive all-purpose glasses from Target. I love that little line detail in the center for a hint of visual interest. Then take one more step to the right and those were a gift from my other bestie that surprised me with them from Japan! They look so organic and beautiful. The stemware above is all from CB2. I chose the wine glasses because they have a cool organic shape and the champagne glasses because they are more modern and refined. All in all, I think the look turned out exactly how I wanted. Also, that striped marble board was online only from Target. WHAT?!
Is it time to talk about the mirror? I think it is…

Mirror (vintage) | Metal Shelf | Spice Jars | Tea Kettle | Copper Towel
I feel giddy even writing about it now. This mirror has been in my family for at least four generations. It hung in our home all throughout my youth but when my dad downsized, it was just going to sit in storage. NEVER! We let my cousin (the amazing one who helped hang my gallery wall and make the cushion you are about to see) have it until I had a place for it myself. I was moving to Australia at the time and wasn’t going to take it there. Too risky. But then I came back and was able to take it off her hands (sorry Becca!). I was excited, to say the least. I love how much personality it brings, the convex mirror and that I feel like I have an important piece of my old home in my new one.
While we’re here, let me throw in one quick small space hack: a wall-mounted spice rack. As you can see, I only have two closed cabinets. So to free up some space, I bought this cool shelf from CB2 and decanted my spices into these jars from World Market. Finding modern spice jars that I liked was not easy but these are very cute. To never question what they are, I just wrote the names of the spice in sharpy on the bottom of each jar.
Let’s now chat about another brass friend, the ceiling light.

Sara did her best to get a decent shot but the kitchen is too narrow and small to get a normal angled photo of the light fixture. Oh, the light hunt. ANOTHER challenge. The first issue was that it needed to be more or less a flush mount light because anything that hung lower, like a pendant, would have awkwardly blocked part of the shelving. The second issue? The placement of the junction box was too close to the shelving and not centered between the wall and shelf, so whatever light I chose needed to be narrow enough to give the illusion it was centered. The last issue was that since it’s the only light in the kitchen, it had to be ambient and disperse light evenly and all over. Hmmmm. I searched long and hard and then about two months ago, I found this one on Etsy for only $150. It’s handmade (and well at that. It is perfect and I highly recommend it to anyone interested.
Now for the moment, you (I??) have been waiting for…the banquette.

I first thought about doing a cute bistro table and chairs but then realized I was missing an opportunity. An opportunity both in space maximization and design creativity. The banquette trend has been on the rise for a while now so it’s not like I reinvented the wheel. Obviously, a built-in with drawers for storage would have been amazing but again this is a rental and putting my dad through all that extra work was not going to happen. I didn’t want to ask and he probably would have said, “Nope, I’m out and good luck.”

Vase | Abstract Art | Frame
This is my version of “keeping it simple.” Red oak stair treads, a brass rod for support/aesthetics, brass brackets not pictured (they are hiding underneath) and DIYed velvet back cushions. This was another design that just sort of came to me. I think all the modern European homes I drool over daily have taken over my brain because this banquette has a very modern Parisian feel but with just the right amount of So Cal flavor (the wood tone). The wood is HEAVY so everything feels extremely solid. The benches are free-standing (landlord approved) and the table is secured with a french cleat (genius!). With a french cleat, all I needed to do was gently and easily slide the flat bracket into the offset bracket and viola! It’s all secured with brass a rod. Julie was the actual savior in the install department. There is no way I could have successfully done that alone. The tabletop was very heavy.
But let’s jump back into the construction side. Here’s how he (and I) did it:
1. Dad asks, “Do I look like an idiot?” when daughter questions if he could build the banquette after showing design plan.
2. Dowel, glue and bar clamp 3 sets of two stair treads to each other and let them dry overnight. (Due to the width of the kitchen and dimensions I needed, a single tread wasn’t wide enough for the benches or table top).
3. Use a bullnose bit to round and bullnose the corners and side facing the kitchen (the fronts already were bullnosed when purchased).
4. Sand wood.
5. Cut legs with a table saw to size.
6. Give pieces to daughter to figure out the rest because dad has to go home (out of state)…
7. Daughter takes a 1 1/2 paddle bit to make holes for the brass rod to fit into.
8. She cries after a reasonable number of setbacks and pressure of only having one shot to get this right because the wood is too expensive to replace and the clock was ticking for the reveal.
9. She cuts rod with a miter saw.
10. She takes home to seal with a water-based matte finish.
11. Use gold brackets and gold screws to secure the benches together (then breaks gold screws because gold screws are soft and red oak is hardwood).
12. She then pre-drills and then starts the screw process over again.
14. Finally sort of succeeds.
15. She then puts up the table with a french cleat.
16. Father returns to correctly fix benches.
17. The end.
Now, let’s get down to brass tacks. The wood was about $500, the rod was $100 (outlet price), the gold brackets were about a $100 and then maybe add another $50 for the little stuff. So without the cushion and labor (thanks for doing it for free dad!) and/or tools, it was $750. NOT CHEAP. But after all the money was spent and the tears dried, I couldn’t love it more. I sit at it every day and it makes the apartment feel bigger because I am really using the whole space in what I think is the best way possible.
ANOTHER DISCLAIMER: While I am an emotional person (don’t show me a makeover show, I will cry), I don’t typically cry when I’m frustrated and things don’t go my way. However, when I have unnecessarily put the pressure of a thousand design suns on my back and bank account, well…crying is inevitable I think.
Cushion time?

White Frame | Register Art (vintage)
This was a tear-free project. The first thing I bought was this lovely blue velvet fabric at Mood Fabrics (I kinda felt like I was on Project Runway), then I picked up two pieces of 2-inch foam and single layer batting from a different store (why you gotta be like that Mood?). I had them cut the foam to the exact size I wanted the cushion to be but got larger sizes for the batting. The batting was going to need to wrap around the back of the cushion with the fabric so that is why it needed to be bigger by a few inches.
After all that, I went to my local hardware store and got a thin but sturdy piece of plywood and had them cut it for me to match the foam. The last thing I needed was a way to hang it flush to the wall. My dad recommended keyhole hangers. Awesome. So what you have to do is chisel out a hole in the back of your wood piece so that the keyhole can lay in there flush to the wood. That will give you the closest mount to the wall. This was important to me since the sides are the first thing you see on the cushion when you walk in. Brady’s DIY headboard was a HUGE help as it served as a guide for the fabric wrapping part. However, my cousin really deserves the credit on the cushion construction. I did the keyhole chiseling but she was a corner folding, stapling pro. It may have taken us four hours…the tortoise wins the cushion race, right?
Also, that piece of art is from when we all went to Round Top and it was a steal at $10. I really wish it was in a bigger frame which I will rectify soon. IKEA really needs to expand its RIBBA series and give us better/more size options. This one is just what I had…the night before.

Top Candle Shelf (left to right): Short Gold (similar) | Black Matte | Hammered Iron (unavailable) | Marble with White Taper Candle | Gold (only in store) | Bottom Candle Shelf (left to right): Hammered Iron (unavailable) | Marble with Grey Taper Candle | Short Gold (similar) | Black Matte | Modern Brass
And here we are at the last and final DIY: My candle holder display shelf. This wall niche was another instant love affair (ooo character) but after it caused some design limitations with the bench/I didn’t know what to do with it, I fell out of love. That was until DIY genius Emily Bowser, yes she DIYs too, came over and said I should make a shelf and display my collection of candlestick holders. She said it so nonchalantly too. Like it was so obvious. Is that what it’s like to be a styling ninja? Probably.
Well, took her advice I did…two days before the shoot? Yep, two days. I went back to the hardware store, where I picked up a very long but thin and skinny piece of wood, a dowel stick and a can of matte black spray paint. I had them cut double the amount of pieces I needed in case I messed up. I then went home to predrilled the dowels, spray painted all three pieces and let them dry. Once they were ready, I used two gold nails I had and hammered them in through the holes I had already made. I knew there would be wood framing around the niche so I was guaranteed to hit a stud. Once the dowels were in place, I simply placed the piece of wood on top. Easy peasy people. Now I get to admire my holders instead of trying to find hidden storage for them. If I had I can guarantee I wouldn’t see those suckers for months.
Phew! So much info but I hope you all enjoyed it and maybe helped to inspire a little DID or DIY in your own life. I may not have all the construction answers but I do have a genetically obligated carpenter who I can relay them to. We will see if he is still answering my calls. He might be done with me for good.
Thank you all again for letting me share my first real completed design project with you. It has been truly incredible and I don’t really have the words (I know, me with no words?). Look out for the bed nook and bathroom in 2021! Just kidding it will be this year. Totally doable. Absoollllutelyyyy. Love you. Mean it.
xx, Jess
WAIT. The before and afters. Please enjoy…now I’m done.


For more of Jess’ Makeover Takeover: Jess’ Living Room | Jess’ Makeover Takeover Intro


Looooove!
beautiful! well done
this is just beyond. love EVERYTHING. also, what color is that fabric from Mood? and is it velvet? I love it and was just looking at their velvets yesterday because i need to reupholster some chairs.
Thank you so much!! I am sorry that I don’t know the exact color but it’s a dark blue velvet. Hope you find one you love!
Beautiful and so well done! This is definitely making me realize the missed opportunities in my past rental kitchens!
no kidding, me too! I always just accepted it, even while I was writing articles about 10 ways to customize a rental kitchen…ha
So lovely — well done! (As a violist, it always cracks me up when people write “viola” instead of “voila” ha!)
Ha! I know it’s voila, but I say it out loud as viola; it drives my husband (a musician) nuts! Viola!
Better than writing ‘wa-lah’ tho…
This is so amazing. Jess, you are such a talented and creative person! And bless your dad! Thank you for sharing x
Such a beautiful little kitchen! I’ve had so many rental kitchens that I have tweaked so I can really appreciate your success! And how amazing to have a Dad that DIYs for you!
Question for EH IT support: Is there a way for me to hide the tool bar (I think that’s what it’s called?) at the top so I can see more of the photographs? On my small laptop that seemingly small space interferes with seeing all the amazing photos you post.
Kelly. – SAME. I’m on a mac and I always press the little green button on the top left to maximize my window.
Do you mean the big logo with the flower up top? or the navigation bar?
The navigation bar at the top (and the close-able ad at the bottom) is the only thing that stays in place for me as I scroll. On a PC, you can hit F11 to go full screen (and F11 to exit full screen) and it helps a tiny little bit.
I’ve been meaning to ask the same thing, but in my case its about the mobile version I see on my cellphone.
Since you’ve added the new rooms and shop sections there’s a blue bar that stays allways on top of the logo and menu bar which takes up much needed screen space.
I understand that you wanted to draw attention for those new features, but now that everyone knows about it can you please take it away?
Late answering – sorry! I guess it’s the navigation bar. I’m not terribly tech savy…..
Same! The blue-ish bar and the white bar with “blog” “vacay giveaway” etc together cover 1/5 of the window heigh on my screen. That’s a lot! I can never see a whole photo, only a portion of it.
It’s great! Thank you for sharing. Love the story behind your mirror and the way you designed the banquette.
Nice! Where is the faucet from?
Yes, tell us about the faucet!
I wish I knew! My landlord got it and told me he was installing it the first week I was in the apartment. I was pumped that I didn’t have it switch the old one out myself. I think he probably got it at Home Depot or Lowes.
Really beautiful, well done
“Do I look like an idiot?” – classic DID. This is spectacular Jess! Love the ingenuity, impressive design and authentic voice you have. An instant favorite!
Thank you for saying that! And my dad while a masterful carpenter and is also one of the funniest/sarcastic people I know.
SO GOOD!! Please don’t make us wait too long for the rest of your space. Your DIY woodworking pieces are beautiful (thanks Dad!). I live in a 2400+ sq ft home and love to see small space design more than anything..go figure!
Thank you and I promise it won’t be too long! The wheels are turning:)
HA I know exactly what you mean. When I lived in an 1800-square-foot place in FL, I ATE UP studio apartment posts on other sites, mesmerized by their creativity.
Reading about the kitchen makeover… made me think back to a post Laurel Bern, NY interior designer did a couple years back about “floor cloths” … which I didn’t know about till then. This may work for you in your temp kitchen… and you can take it with you when you leave…! Also, one of the first commenters on the floor cloths talks about a company called ruggables— this looks very good from photos— and you can machine wash the upper decorative part of the covering! Sounds great for in a kitchen! Enjoy your home, and thanks for sharing!
https://laurelberninteriors.com/2016/08/24/hardwood-floor-getting-wrecked/ Laurel Bern article
https://ruggable.com/products/cambria-sapphire?variant=52922005252 Ruggable… who knew?
this sounds like so many building projects I start with my dad!!
-dad gets me started and explains the rest of the project clearly
-I have a breakdown trying to follow instructions alone
-I figure it out but it’s not great
-dad walks me through it again
-everything is fine
your place is so beautiful!
haha exactly and thank you!
wow this is so true… My dad is currently helping us renovate our house and I literally text him every day with wild (and likely bad) ideas to which he ignores and proceeds to do the correct version on his own. THANK YOU DAD.
Can you just swing by my house real quick and help me design a banquette? Oh and fix my all tan kitchen? I’m not above begging.
ha you are too kind!
That banquette blew me away! You perfectly captured the Parisian California style. So much inspiration in so little square feet. Brava!
Loving it! Such a wonderful job!! I think this has been my favorite EHD post of 2019 so far, even though I can’t DIY anything myself. High five!!
Thanks girl! That means so much to me<3
SO. PRETTY. (imagine 100 heart eye emoji’s here) You will definitely be helping me french cleat my headboard DIY.
you got it!!
This apartment makes me miss my bachlorette days and the excitment of designing a little place just for me. Of course, mine were never nearly as stylish. If i had only known! Wonder if my family would mind if i got myself a little place on the side? 😉
So gorgeous.
Looking at it, I also think your kitchen had great bones? For someone who lacks a DID, or the skills to do it themselves, you could have kept the counter, used wild and crazy knobs, done a peel and stick floor, and then vintage unmatched table and chairs, would have been a whole other route.
But I love what you chose, such a defined aesthetic, and while it’s au courant, also seems original to me.
Totally and thank you for your sweet words! I was VERY lucky to have my dad’s skills:)
Wow, wow, wow!!! This transformation is amazing. I’m totally impressed! I love how you guys are sharing more stuff about small spaces + rentals. Thanks for sharing!!
Love his! But let me ask — is this an apartment you own or rented? I’m assuming own based on the extent of changes. For those of us who rent, it’s hard to create such dramatic makeovers (e.g. countertops replacement). Any tips on working within a rental would be really helpful! Maybe a specific post dedicated to this topic?
I think this is a rental. I’m guessing she ran all of this by her landlord OR is planning to spackle all holes when she leaves to get that deposit back 🙂
She is clear that it is a rental in the article. Many landlords will support changes like countertops provided you are truly improving the place. Doesn’t hurt to ask! I’ve had landlords agree to pay for materials if I supply labour.
I am a crazy gal who is willing to put $$ into a rental. The reality of me owning a home is not likely annnnytime soon. So while I completely get why someone wouldn’t want to pay to get a temporary cover made to put over their rental kitchen countertop, it’s something that helps me love the space I am in now (and probably will be for a few years).
Here is a blog post we put together last year full of pretty easy design fixes:
https://stylebyemilyhenderson.com/blog/10-easy-things-space-update-weekend
I’m not sure it’s totally clear, but the countertops sit on top of the original countertops. So they can be removed when she moves out if the landlord wants it back to the original condition. Pretty cool!
Amazing! I’m so inspired to do this in my rental. I’m a little confused on the back splash, is it laying against the existing one? Or it it built like a little box to sit on top/over it? Congrats on all your hard work!
Hi Eleanor!
Thank you and you should! It’s more like a box that sits on top of the original backsplash.
amazing job!
A million YESes! Love everything, especially the banquette and candlestick niche and countertops!
Looks fantastic! Well done!!
Aaaamazzing. I do think you need to include a photo of your dad in the next reveal. He seems like a fabulous guy and definitely has earned his spot in a reveal.
Great job by all of you. Love all of the personal touches. It must make you so happy to see yourself surrounded by projects that you have done on your own and with family and friends.
If I can convince him to help me again that’s a great idea! He would happily get in front of the camera:)
You were spot on with the wood counters! They really do make the space!
Also, I would love to see the cost breakdown of the DIY/DID projects in your home!
Thank you so much!
Like I said in the post, the banquette all up cost about $850 without labor. The counter was closer to $100 but again I didn’t have any labor cost because of my talented and VERY kind father. The little nook shelf was under $20 and the wrap around bench in the living room was a little over $600 for materials.
All up it wasn’t cheap (even with free labor) but I don’t regret a thing. I am so happy every time I’m in my home.
Love this post and love your writing style. Well done!
Gorgeous kitchen!! I just love everything about it! I wish I had you as an inspiration when I had to deal with an old ugly kitchen at my first rental.
Enjoy your little piece of heaven. (-:
Well done! I enjoyed the reveals of your little apartment very much and will look forward to the rest.
I find it so enjoyable to work on a home when faced with limited space and funds. It’s what truly gets your creative juices going. The temporary banquette at the end of the kitchen is yet another genius design! Bravo!!!! Can’t wait to see what you do with the bedroom (and bathroom!).
I love all the maker over take overs but this one is favorite! Everything about it so creative and working with the space you have! More please!
So beautiful! This makes me regret my move from my Koreatown apartment.
fantastic! it is all so great! such good styling even the potentially weird floor looks good!
I can totally understand changing up that kitchen so that you can stay there longer. Sometimes you love the space, but there are things that are just offensive to your eyes. I once stripped the window frames and doors of 100 years of paint and it revealed actual details in the wood surface that hadn’t been seen for 40 years due to paint filling in all the carving! I’ve replaced faucets, built cabinets…whatever it takes to make it so that I could stay for a couple or 10 years. I think you made this place look fresh and clean instead of kind of dated. The bigger question is–is your father still married to your mother? And if not, can I meet him. He sounds really funny and his carpentry skills are very clever. Those seem like good attributes. And he has a nice daughter… just asking.
oooh missing my dad today. he was a master DID/woodworker/carpenter/overall handy guy. there are so many projects i wish he could help me with. what a special thing for you two to do together! i know you treasure these times together; it’s clear from your writing. xoxo
Forget the very cute kitchen – what part of the Camino did you walk? I’ve walked from Leon to Santiago on the Frances, from Ferrol to Santiago on the Ingles, and from Baiona to Santiago on the Portuguese.
Carol, you are crazy impressive!! We also started in Leon and ended in Santiago. It was incredible. Might need to do the the whole Camino Primitivo someday:)
What an amazing job! Hey, you said that you don’t cook often. If you really don’t ever use the oven, and you have a storage space, you could get rid of the range and just get an induction burner to pull out and use on the counter top when you need it. Drastic? Maybe, but looking at the amount of space you have to squeeze into in front of the sink would make me want to do that. You could even build a little shelf over/around where the stove gas line comes out so that you’re not looking at that and you have a narrow counter space along the wall there.
I actually do use the stove and oven a decent amount since I don’t have a microwave and I also use the oven to store pots and pans when not in use. But thank you so much for the great ideas! They are super smart:)
Oh my god you just answered my question to solving my ugly granite countertops without moving the sink etc and i could cryyyyyyyyyyyyyyyy. Question though, you only sealed seams with silicone? The countertops are not sliding around at all? I am wondering if I should at least take small screw brackets and attach the underside of the overhang to the wall on each side??
O yay! Ugly counters be gone!
Mine is very snug because of a little notch he had to make for the shelf brace on the left side. Also, it’s snug between the back of the faucet and original backsplash. So far no movement. However, brackets would be a great idea if you are worried about it moving around. Good luck!
Hi Jess,
Thanks so much for sharing your apartment- it’s beautiful. I’ve been wanting got cover my counters (ugly badly installed white tile) ever since I first Sarah’s article. I have a tech question: how did you get the back splash piece to sit flush against the wall? You mention it sits right over the original. Did you just use a piece of wood or did you build a kind of “box” to put over it? I have a small tile back splash and if I put a piece of wood in front I have a gap from the tile that’s just big enough that caulking wouldn’t seal it. Hope that makes sense.
Tell your Dad, yay! Just lovely.
Thanks!
Maria
The banquette and the low shelf in the living room are strokes of design genius on your part and your dad deserves major credit for executing them so beautifully. FYI, here’s a basket like your stolen/borrowed one:
https://food52.com/shop/products/5552-handwoven-nesting-storage-bowls-set-of-3
Hi Betsy,
O those are the exact ones I bought! I was talking about the wooden bowl next to those pretty baskets that I wanted to steal from Emily. Don’t worry it’s already back in her possession:)
I think I speak for the entire internet… OBSESSED
Really inspiring. Love the seating area, and the candlestick collection. Now I need a niche and an excuse to display mine.
Wow, this is awesome!! I seriously wish the internet had existed (therefore blogs as well) back in the day when I was decorating my apartments. So many good ideas to glean!
That banquet is genius and your dad is a mench! Great work!
That he is and thank you!
LOVE this! Thank you for including the steps to make the custom counters–do you recall about how much it cost you? I’m super interested in doing the same for our apartment but without a DID I’m curious how much $$$ I’ll be spending if I mess up and have to start over 🙂
And yes–echoing comments that the focus on quality, beautiful small-space and rental makeovers is much appreciated–thank you!
So many Remodelista posts feature expensive and overpriced items, but the kitchen counter plywood overlay makes wading through all that nonsense totally worth it.
I luhrve the banquette area the most! The table and bench details are superb. I’m actually surprised you left it so minimally styled and didn’t stick in throw pillows or a Roman blind etc, but I like the slightly different vibe from classic EHD. Your cork/vinyl/splotchy brown floor is blending in fine with the other natural browns you have in the space and I appreciate every time I find a designer working with something not quite perfect as most of us do have lovely limitations in our own homes!
I like how deep those benches look. Maybe weird question – can you sit on them crosslegged? If so, do you mind sharing how deep they are? Thanks!
Yes! Kitchen mirror! I am also the proud owner of a kitchen mirror (and a very tiny kitchen). Your place looks beautiful. Congrats.