


Today is the big ‘Castle Clubhouse’ reveal . . . don’t worry, we’re cancelling Christmas and birthdays this year because, well . . . our kids got a ‘Castle Clubhouse.’ We partnered with Wood, Naturally on this very unique project and it really is the gift that will keep on giving for years, and years, and years. Wood, Naturally is great resource to find inspiration and how-to plans for tons of softwood projects – big and small! But let me rewind and give you the whole process and back story.

We bought this house and the backyard was absolutely great, but we wanted to make it more magical (this was the dormant winter). Both Brian and I (as you know) were raised with huge backyards (in the country) and want to make sure that playing outside was a priority for our city-raised kids. We chose to invest outside instead of a playroom inside because we want to force them outside – remember in LA you can play outside year round. Could they play outside and explore nature without a castle clubhouse? YES. One does NOT need this in order for kids to be entertained, or for you to feel like you are a good parent. But with a good excuse to build one, we did.
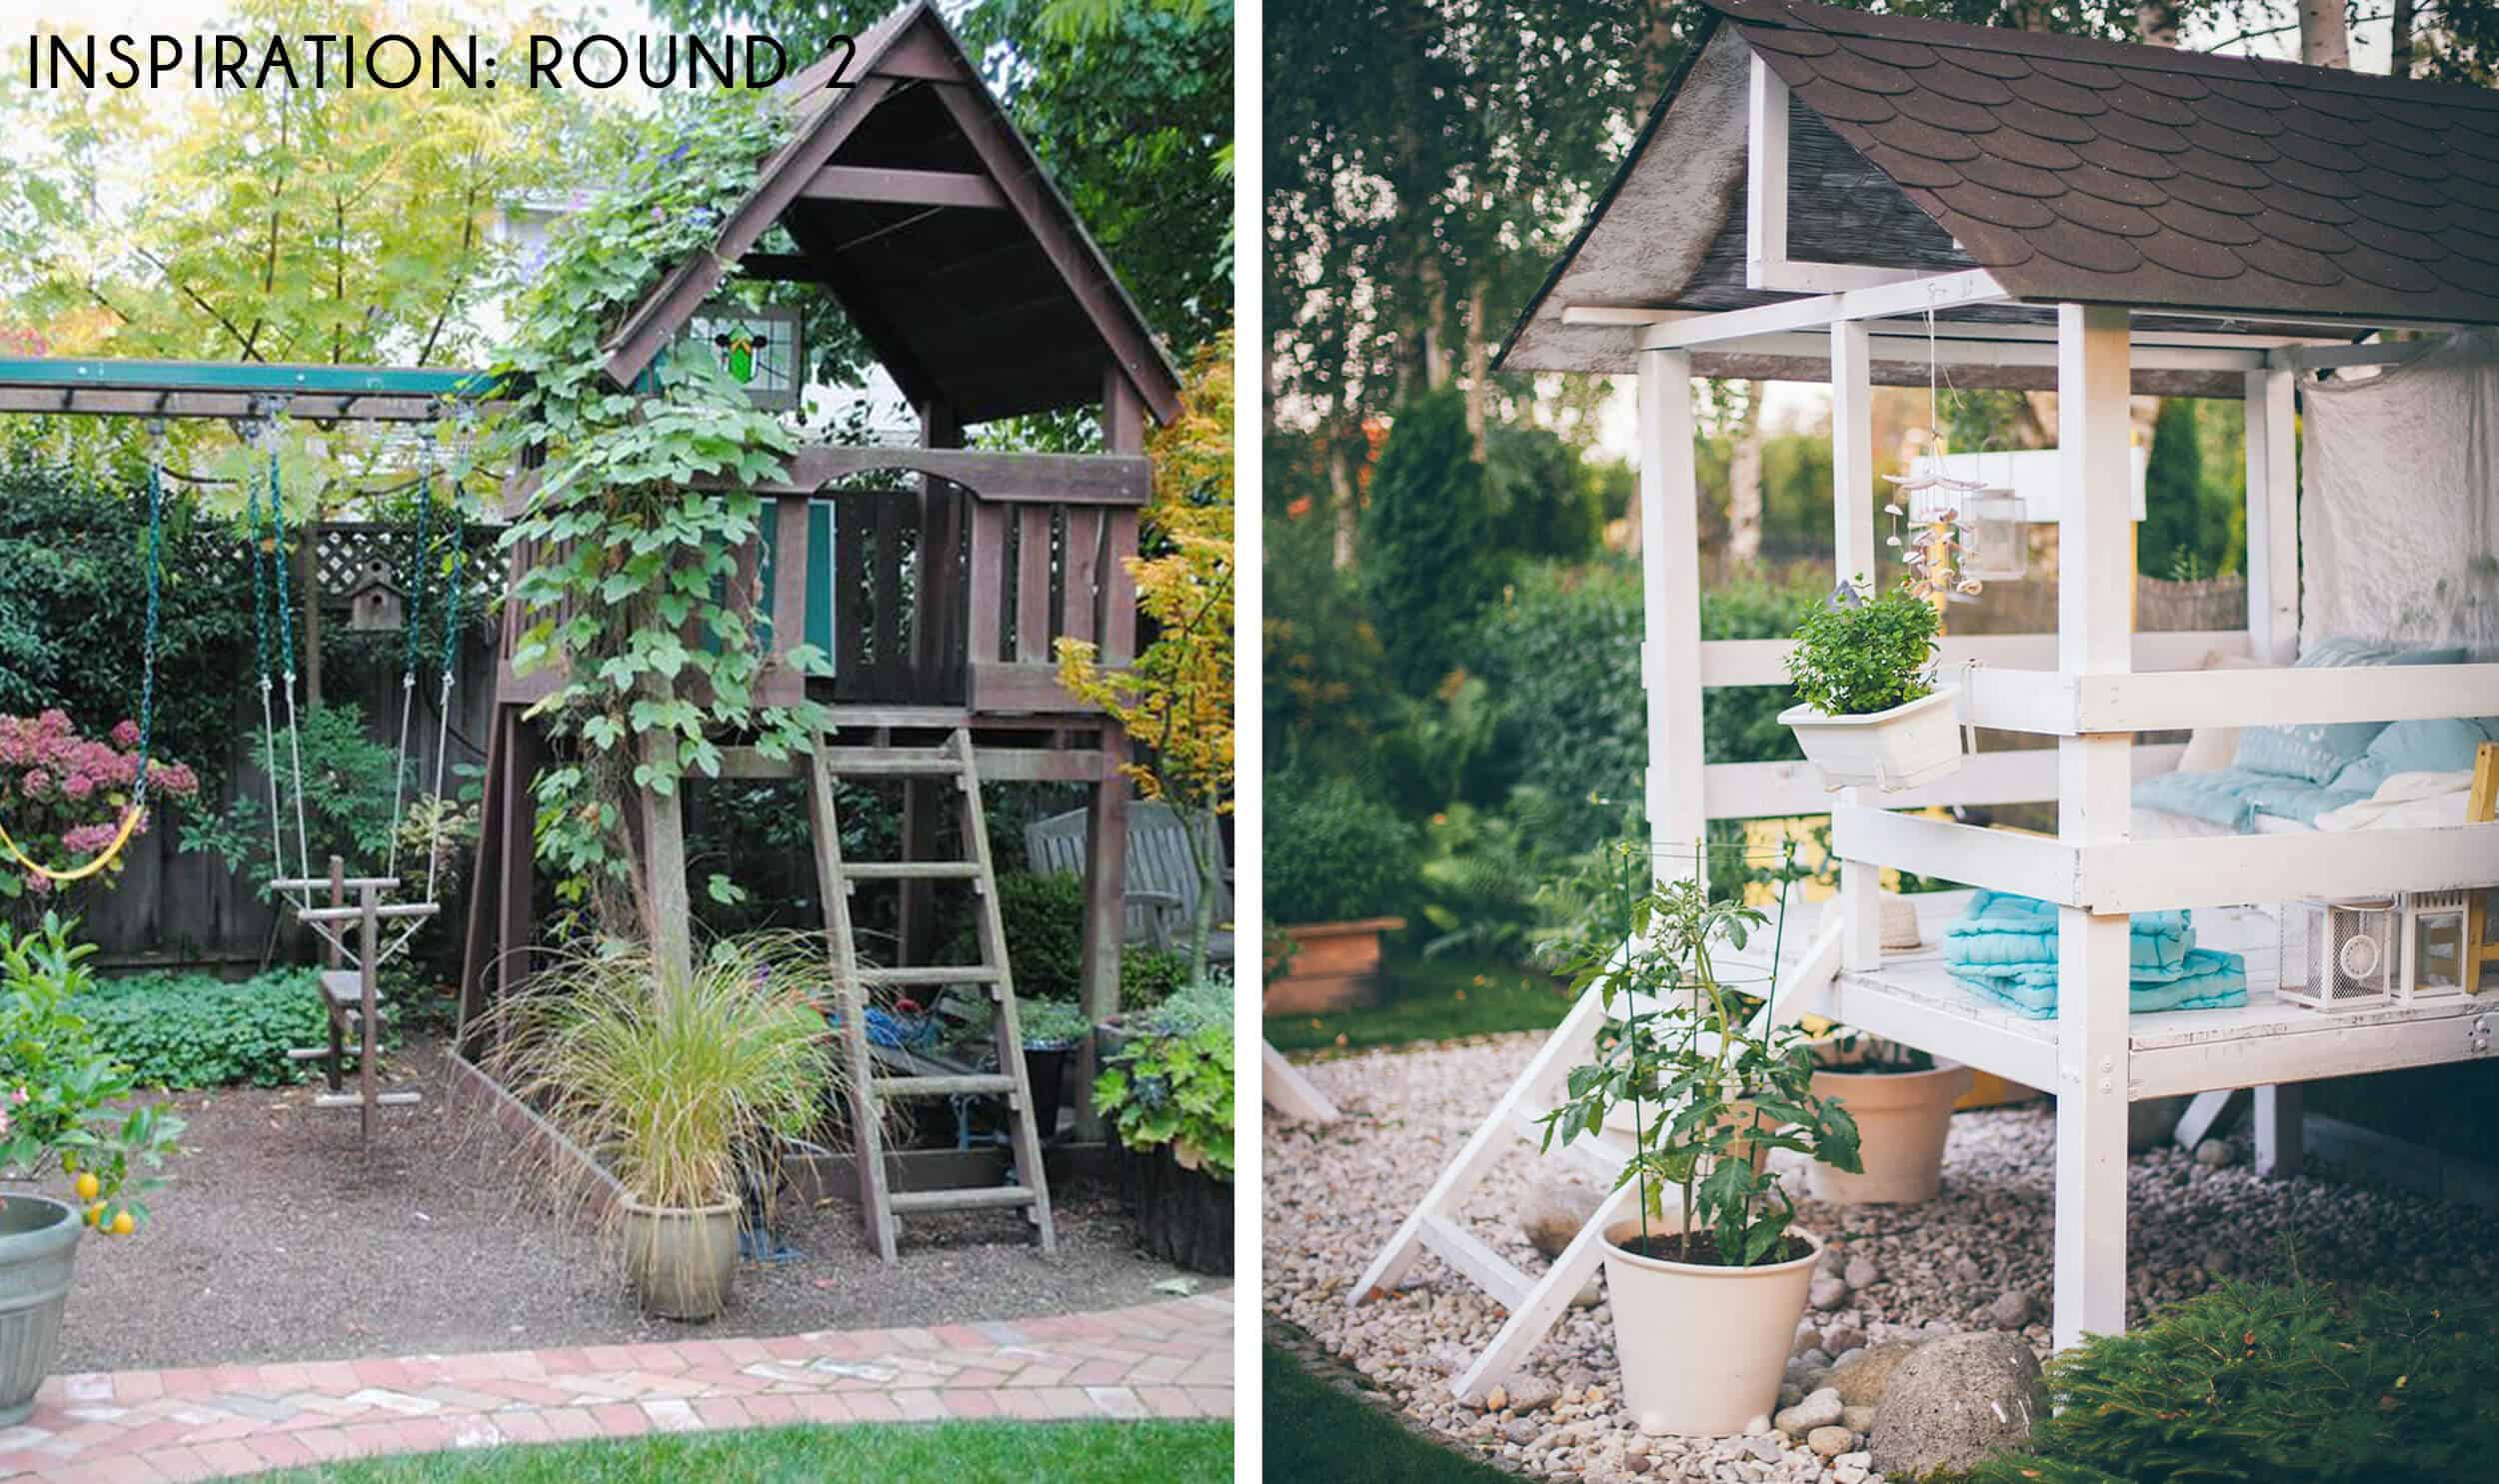
When Wood, Naturally approached us to partner on a another project I knew just what we would do – a fort – and after pinning and pinning we found some inspiration that we loved:

We wanted it to be more ‘fort’ than ‘playhouse’ because we remember not loving our playhouses because they were indoors. We wanted something they could climb, with a few obstacles, and the feeling of openness. And we liked the idea of raising it up high to utilize the space underneath for hiding and exploring.
But I also fell in love with this vibe – something more english and overgrown:
As we sourced for more inspiration, I felt like we could make it even a bit more editorial and special. We thought of themes that both our kids would enjoy and stumbled upon these amazing castle fort images:

Now those are certainly elaborate and would not be covered in our budget. So we merged the two ideas – something that had a castle feel, but structurally was fairly simple – you know, no architect or general contractor needed. We certainly didn’t have the space for an insanely huge play structure (although this one is pretty big!) but as a designer I also did want to make it feel special. In a perfect world our kids would just find a bunch of sticks and rocks and make one like we did growing up, but we’ll save that parent guilt ’til we have a country house some day and MAKE FORTS THEY WILL 🙂
First – the initial rendering:

This was a good jumping off point for ideas. We put it out there on Instagram that we were looking for a carpenter that could execute it and got a few people interested. One quote was $10k, and the rest were around $5k (not including the slide). This seemed astronomical to us and we almost pulled out and decided to downgrade, but then we remembered ultimately that good work takes time and cost money. Oh to have married a carpenter!!!
Don’t worry – because in came Chris of Lumpkin Custom Furniture.
He tried to simplify the moldings to save on cost and did his own renderings:

Then my design team and his sat down and hammered out the details and drew up CAD plans (you know, as you do for your castle clubhouse) . . . My hope is that by doing these drawings you guys could recreate a version of this with all the design work done.

Having this rendering was crucial to making sure that all the proportions were perfect, and that we liked where all the joints were and how they were connected. We had to be fairly flexible after this but at least we had a great plan in place.
Chris recommended Pine for the walls and Douglas fir for the posts. Pine is super affordable and long lasting, plus it just felt right for a fort. Cedar is also a great choice, but we all liked how the finish of Pine felt more English Castle. One thing that we knew was important was to choose a real wood and not a composite or faux wood. The whole point here is to get them away from plastic toys, not playing on one all the time.
Chris and his dad got started with the footings. Now the drawings do look simple and while I’m sure many of you could recreate this, it should be said that making sure the castle was level took a lot of skill and math on these guys’ parts.

The plans said 4′ off the ground but the ground sloped 1′! I think it ended up being 3 1/2 at the shortest and 5′ at the tallest. They poured the cement and secured the footings so little Charlie and Birdie wouldn’t tip this sucker over.

Over the next week they built that lady out of that pretty Pine. They started with the platform and framed it pretty much like a normal house with studs.

I originally thought it would just need posts on four sides, but that’s why I’m a decorator and not a house builder. They made it super strong and even faced out the inside so it would have walls and not just framing.

We were getting so excited . . .
The castle structure was almost done and it was time to choose the stain and sealant.
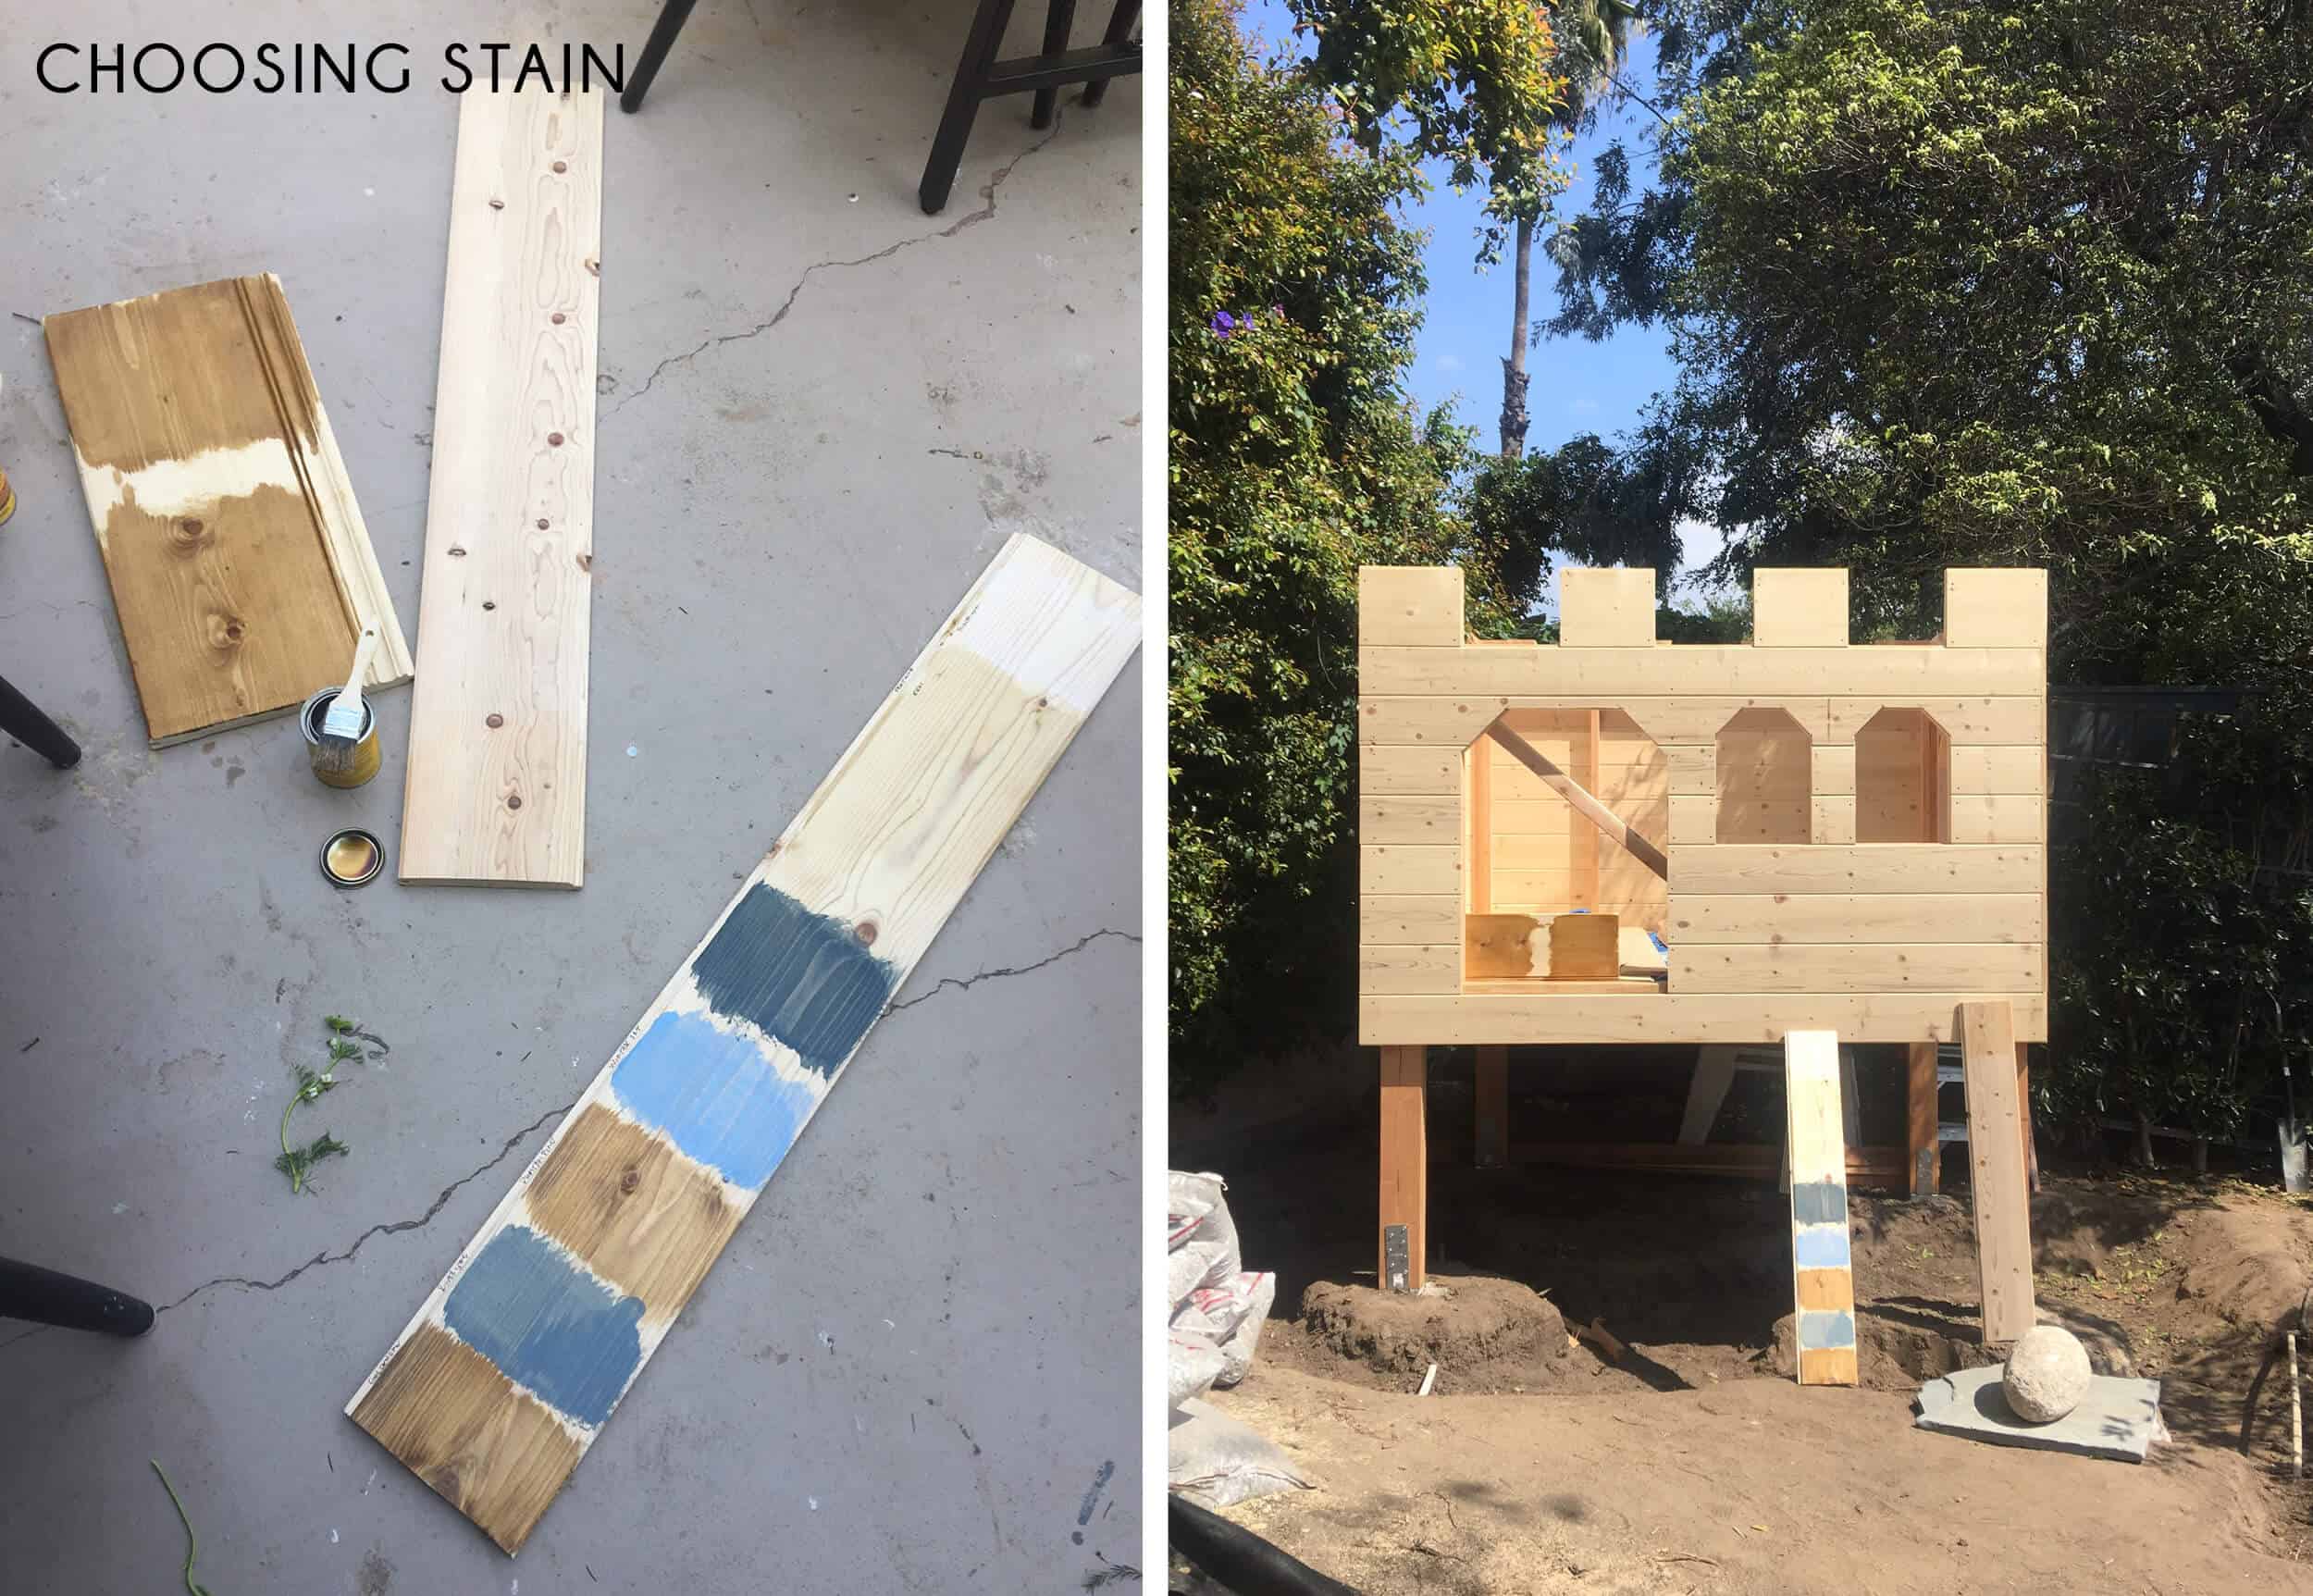
While I actually loved how it looked as is, it did feel very bright and NEW back there, almost white at times (which isn’t a bad thing) and Brian really wanted it to be a little richer. Also we knew that the stain will eventually fade which would be a great thing anyway. I tested a few different stains and some colored stains as well – which really just looked like paint to me. We chose ‘Puritan Pine‘ and got started. It was just slightly darker – or so I thought. (in the photo above it’s the one between two blues). Since the Douglas fir is darker than the Pine I wanted the stain to marry the two tones, which didn’t work perfectly but it’s all good.

We liked that it was darker but more brown than red. They stained for a couple days then sealed it afterwards so that it’s safe from rain and the elements.

The stain took to some of the planks differently so there is more variation than I thought there would be. Part of me still loves it as raw Pine, but having it darker and richer does feel more old world and finished.

Oh I’m sorry… I forgot to tell you about the pebble pit/moat. Well, I was going to save this for the landscaping post but here’s the gist – most of you suggested a pebble pit instead of a sand box and we loved the idea of boulders for them to climb all over and hide behind. So we created the moat out of pebbles and boulders.

Now, the rock dude put WAY too many large rocks near and under the slide so we moved a ton into the back corner so the kids wouldn’t fall from the slide and hit them. He didn’t have kids and had never done a pebble moat before (who had?) so even though we were super, super, super clear that we wanted a couple boulders and mostly pebbles he showed up with a dump truck of big rocks. After he left we moved them into the back corner. Eventually when we do the front yard we’ll move 1/2 of those in the corner up there so it’s not so rock-heavy. We kept some big boulders around the perimeter of the moat for visual interest and for climbing. We are pretty big on the kids taking moderate physical risk in a safe space so while boulders might scare you, they don’t scare us. For instance on the drawbridge they can certainly slip and fall down it landing on grass, but they can’t fall out the sides and land on rocks.

We joked about putting electricity out there so we could have real sconces and a power source for a boom box. And by “joking” I mean I got a quote for it (because our electrician was here doing other things) and it was $1800 (mostly because I guess our power outside was in an aluminum pipe which was rotting or something). Obviously we didn’t do that as it would have been insane. But I did tell Brian that I was considering putting in plumbing so we could have a mini-kitchen and for one split second he believed me (with horror).

We did, however, put on a window box, some custom Sunbrella flags with a big H on them, and a LED candle sconce.
So here is how it looks as a finished product without any toys or styling on the inside:

We added a slide (from Wayfair) and it’s a great one – I read a lot of the reviews. Many slides had reviews that said they were too fast, and many said too slow, but this one is perfect. It’s fast but doesn’t have a drop off at the end. We also replaced the swing seats in the same green and they look pretty pulled together.

I found these two flags in Roundtop, from a real castle. I brought them outside and within 1 day they were virtually ruined. I’m going to repair them and frame them inside (in Charlie’s room) but learned my lesson that they needed to be made out of Sunbrella fabric. So we had the flags replicated out of Sunbrella and put H’s on both sides. I hired a seamstress because I didn’t have the time, but this would be VERY easy to DIY – we got the flag poles on Amazon.
We added a handle at the top of the slide just in case they needed the extra brace. Before we moved all the boulders we were definitely worried about the kids falling off the top, especially other people’s kids if they didn’t know the rule of no horsing around at the top of the slide. But once the boulders were moved and it was all pebbles underneath we didn’t worry.
As a quick note if you are into this pebble moat idea – at first we dug way too deep and we ended up taking all the pebbles out, adding more dirt, putting in a pond liner, putting holes in that pond liner for drainage, and then adding about 6-10″ of the pebbles on top. They can’t make sand castles but they play, and play, and play down there with trucks and buckets. Plus we have a lot of jewel hunts.

So lets give some details:
The castle is 6′ x 6′ and overall its 10′ tall. It’s made of 90% Pine with Douglas fir posts and railings. There are a lot of faux wood building materials out there, but they look like that – faux wood. It is constructed like a house – with a cement foundation, and solid framing. We added and L shaped moulding on the corners and the turrets to help it look more finished and to hide some of the screw holes.
Lumpkin furniture did a FANTASTIC job and Chris and his dad were so great to work with. Building a castle isn’t exactly a normal request and they had to trouble shoot many things along the way – the windows, the height/safety of the ramp, etc. For instance to help them climb up we originally had 1×2 pieces of Pine but it didn’t give them enough grip so they took those off and added 2×3’s.

Here is how it broke down cost-wise:
Cement footings/post bases = $125
Lumber(Douglas fir/Pine) = $1200
Stain/sealer = $40
Labor = 9 days total for 2 experienced carpenters. Essentially two weeks with two guys.
Labor costs will vary based on location and skill level. This is certainly something that many handy people could attempt on their own. We were happy to hire this team that was experienced because we did have a deadline and a sponsor involved. While I would always suggest hiring someone experienced, I also know that not everyone has their play forts sponsored. This design could absolutely be simplified or not elevated to help save costs and still be lovely.
Now on to the accessories:
–The slide was $390
-The flags – oh how did these flags add up!
–Poles $13.95 x 2 = $27.90
–Pole brackets $7.99 x = $15.98
-The fabric was $180 and labor $150
TOTAL FOR FLAGS: $373.88
GAH. I basically handed off the flag task to someone else to execute and honestly had I known those flags were going to cost that much I definitely would have found something readymade and customized them. I’m honestly not sure why the fabric was $180 (it’s Sunbrella, but still). And if I had time I would have sewed them but I didn’t, so we farmed that out. We installed them ourselves. I do love them, but man …. 🙂

We played like this for a month or so and we kept noticing that they were dragging things from inside into the clubhouse to play. On the weekends we would watercolor up there or bring up throw pillows and read. So for the final shoot (and for the summer, since it doesn’t rain here) we stocked it full of activities – an art station, some costumes, a bean bag and books for reading. We put a chalkboard on the wall and attached bins to fill with supplies. We didn’t want a lot on the floor that would create a tripping hazard so we tried to have everything installed on the walls.
We had some friends over for the big debut and the kids went pretty nuts.

They literally destroyed it with water soluble paint within an hour and we couldn’t have cared less.


It’s their space to totally explore and have fun. Nothing is precious or fragile.

We DIY’d some flower crowns and capes, and not surprisingly the girls were into the crowns and the boys were like “what are these hipster capes out of vintage plaid with ball fringe on them? Where is the Spiderman cape??” I told them that Spiderman capes weren’t Pinterest worthy and they understood (JK).

They painted the easel, the walls, the bunting that we had made, the floor, and of course they are painting the rocks.

They use the slide and ramp as a track and just race around all day and night. I literally feel like I’m living out a fantasy.

And when friends aren’t over Charlie and Elliot play alone, or the two of them play together really well. Remember when I had that big post about ‘how do you entertain a toddler?’ Well, once we set them up with these activities they really do entertain themselves – not just in the man made castle but all over the yard – looking for bugs, digging through dirt, etc.

On Friday nights (or all weekend) friends come over and it’s like a frat house for parents – we relax and hang, and for the most part they play. Obviously with multiple boys there is some breaking up of fights (there is a reason we didn’t stock the castle with foam swords and shields:)) and sometimes they have issues sharing, but having a backyard with a built-in activity for them really has made parenting easier.

Now hopefully we have outlined well enough how you could possibly make this, but I also wanted to give options to those of you who don’t have the time to execute this or the budget, of course. So we pulled together a roundup of readymade forts (that you have to assemble) that I was pretty tempted by, and which are fairly simple and affordable.

1. Retractable Playhouse | 2. Playfort Sandbox | 3. Castle Playhouse | 4. Modern Playhouse | 5. Covered Convertible Sandbox | 6. Little Lodge Wooden Play House
I’m not sure #3 is for outside so double check this. You could even take something like #2 and put it on posts and raise if off the ground. They are all made out of soft wood – Pine, Douglas fir, or Cedar which you know I appreciate for its durability, affordability, and appeal.
For those of you who are interested in something more elaborate – here you go:

1. Castle Playhouse | 2. Ship Playhouse | 3. Swing n Slide Jamboree Fort | 4. Large Castle Fort | 5. Backyard Discovery Playset Swing Set | 6. Playhouse with Deck
A big thank you to Lumpkin Custom Furniture who do far more than furniture. They can pretty much execute any built-in or carpentry job possible. I’m excited that we have found a company in LA that we can rely on in both quality and customer service. They’ll tell you secretly that I push for fast results and will change my mind despite having a really solid plan if something doesn’t feel right, and they were absolutely willing to make changes and just so lovely to work with.

I’m so sad that Jeff (Chris’ dad) isn’t in that shot. They were both so fun to have around and are invited over any time. If you are in LA and have any interesting or basic carpentry projects (they even do fences) check out their work and contact them here.
A huge thank you to Wood, Naturally for partnering with us on this. Like I’ve said before, there are a lot of faux wood building material options out there, but opting for the real stuff (which is also more sustainable) is very important to me – both indoors and out. If that castle were made of one of the composites it would have an absolutely different feel and appeal. The look of the Pine helps it feel more organic, natural, and grounded.
If we can’t raise our kids in the country, the least we can do is surround them with as much nature as possible – and that includes plants, flowers, butterflies, trees and yes, real wood. Let us know if you have any questions on the process but in the meantime here is a little video showing how it all came together:

*All photos except the portraits by Sara Tramp, portraits by Tessa Neustadt
**This post and project are obviously sponsored by Wood, Naturally – a campaign that lets me build things and create content out of a material that I obviously love – Softwood 🙂


Dreamy!
“there is a reason we didn’t stalk the castle with foam swords and shields”
I think you want “stock” instead of “stalk”.
Sorry grammar police, totally blaming my Mom for that.
I love the playhouse – it’s the perfect mix of interesting and special but still a blank enough slate for kids to use their imagination.
This is seriously so amazing. Nice work!!!
For the love of Pete, this is so freaking cool!!!! My little kid self and my adult(ish) self LOVE it! I have a two year old son and I just kept thinking of him losing his mind over that pebble pit. Can’t wait to introduce that idea to my husband. 🙂 🙂 Love the pics of the kiddos having a blast out there! They will get so much use out of it! All the little details you thought of really make so fun. I did laugh out loud that you broke out the cost of the flags, so funny. Such a great, great idea for your family!
Emily, this looks fantastic! My girl (just a little older than Birdie) would go nuts for this, especially the pebble pit! We’re thinking about adding a play area to our backyard, and this is awesome inspiration. Are you able to provide sources for the inspiration images? I’m interested in the Round 2, right image (white elevated play deck) in particular. Thanks!
The sources for the inspiration pics are listed below the images (in tiny font with links). Here’s round 2, right image for you: http://www.lazysundaycooking.com/garden-play-house-for-a-girl/
Good luck with your backyard!
Everything. EVERYTHING about this is perfect!! I’m wishing I was 6 again and could play all day outside in a fort like that!
Ahhh…love it! Enjoy your family and what a magical place to be a kid!
xoxo
Wow, that’s an impressive castle! This makes me feel kind of bummed about our dumpy city backyard.
Such an awesome post! I love it and so appreciate how much detail you give so that your audience fully understands everything that goes into these things. It was so generous of you to share the plans and I secretly am wondering how I can build one for myself ?
Your kids are so lucky to have this dream space to play in! I totally want to move into your backyard now! Looks like so much fun! Great job!
This is AMAZING!
Do you mind sharing the final labor cost? I’m so curious, but totally understand if you don’t want to share.
This looks completely magical, Emily!!! The pebbles/boulders are such a great idea, and really help the castle look like it belongs there.
I want to throw out another great resource for readers who are looking for playhouse ideas. Bob Borson of Life of an Architect blog does a playhouse design competition every year to raise money for charity…the top designs are built and auctioned off to benefit the non-profit Dallas CASA. Lots of inspiration there! http://www.lifeofanarchitect.com/tag/playhouse-competition/
Additionally, Bob designs his own playhouse every year, and provides the construction drawings. There are eight of those, all linked to in this post: http://www.lifeofanarchitect.com/playhouse-designs-and-drawings/
Thanks for the link! Now I can show my husband these instead so I don’t end up with a Lego playhouse or the equivalent in my backyard…
Not only do I think the castle is awesome, I love how much time and energy you put into the post. You really did make it reproducible for interested parents. I couldn’t agree more that playing outside is the best world for children. Love picturing you sipping pinot grigio and engaging in adult convo while the littles are happily engaged in the garden!
I have the castle that is #1 under the “Play Forts//Elaborate” section, and I have mixed feelings about it. We needed something small because it is in our side yard, and it’s pretty inexpensive. It’s fine, it was kind of a pain to put together (I think my kids learned some new words that could get them kicked out of pre-school while we were putting it together), but the kids love it. They play in it for hours, and my husband and I put it together ourselves, which is great because I wanted our kids to see that we built it for them (because I’m dumb…the kids don’t care about that and our marriage barely survived. Ha). I have been looking for ways to spruce it up, so this post was great! Definitely going to play with flags and window boxes!
Every time we do any sort of home improvements in here (even putting up a lamp, or draw holes for towel hangers) we put our marriage in risk… so I really laughed with your comment!
haha – so true! When we pay a handyman to do relatively basic things, I always justify it with “cheaper than therapy!”
Ah-ma-zing!
Love it all.
I expect you to throw a Game of Thrones party!
I’m off to create our a flag for our playhouse.
Biggest thumbs up possible on the post. My children are way past this stage but this type of information is so helpful for any project. The effort put forth in presenting the stages and decision process you went through is invaluable. Thank you!
How much does it go for on Airbnb?
Seriously – it is magical. I might add a throw rug inside and more dragons and unicorns, but is pretty perfect. 🙂 I hope your family makes incredible memories for years to come.
Looks Amazing Emily! My only concern is the use of Pine for an outdoor structure. The few pine items that I have put outside have rotted quite quickly (even here in sunny CA). What treatment did you use? I would love to build something out of pine (because of $) but I am concerned about durability. Thanks!
Thank You. We worked with our contractor and Wood, Naturally to make sure this castle is going to stand the test of time (and the elements here in California). We used a special stain and sealant that would help to specifically protect the wood as well as bring out the natural grain of the wood. We will probably have some ongoing maintenance every year or so, just like you would with any outdoor piece but we love the way it turned out, so it is worth it. You can also check out Wood, Naturally’s FAQ page which might answer a few of your other questions.
xx
You’ve created such a special place for your children to play! I love that you kept the swing set, it looks great and nostalgic.
When my daughter was younger we hid lots of gems and other secret items in the rocks for her to find. When you go to the beach you can add shells that you found together. When they get a little older and can handle how to do this you can put smooth stones in the oven and take them out one at a time and let them melt crayon all over them, with an oven mitt on one hand! They get mesmerized by it and they all turn out beautiful!
It’s just perfect! Not only did you give us all the dirty details of the project, but you also looked up budget options online for us?! You rock!
Lucky kids!
The flags make it!
Ummmm….that is EPIC!!! And I don’t even have any kids and I still want that pirate ship fort in my backyard.
love love love this! I would love to read some of your landscaping advice. your yard looks amazing!
I’ve commented before for some of you recommendations for potted plants on your deck 🙂
I love this, and I can’t wait for the landscaping post. Also, you have an amazing parenting philosophy – – there is a big difference between hazards (which you have accounted for) and risk (which kids need to explore and test and get comfortable with). Mostly though I wanted to say THANK YOU for not succumbing to the haters last week. I was so worried you would stop showing us your new house (I LOVE these posts), stop telling us how much things cost (it’s useful!), or stop telling us when you made mistakes (also useful, and it makes me feel better because I do too, AND I make mistakes in my job. Which I am very good at, like you 😉 ) I.e. I was worried the haters would wreck it for the rest of us – – remember that your popularity shows you are doing this right. THANKS FOR NOT CHANGING!
All of this and more! It’s hard to not let negativity get under your skin but a valuable lesson to learn that not everyone is nice, not everyone is going to like you and not everyone knows how to relay constructive criticism! Your beautiful just the way you are!! From another Mom who likes this blog!!
Agreed!! Been reading your blog for years, never posted. Love your work, love your transparency! xxx
BEST.PARENTS.EVER. I want this in my backyard!
What a great project!. It makes perfect sense in your climate zone too. It will get lots of use. Practically every day for the entire year. It truly is an outdoor playroom. Very insirational. Would love to do something similar for my kids. Also thanks for all the details.
Oh my gosh, I would’ve loved this as a kid. I would’ve turned this into a school for my stuffed animals when I wanted to play teacher, or a restaurant when I wanted to take orders on my fancy order notepad!
Love, love!
This is so amazing! So do you think given the direction you provided here, we could get a proper quote from a carpenter? Also, where did you get your swing set?
Wow! What an amazing dream. I just love it. The little girl who lived across the street from my aunt had the most amazing playhouse when I was a kid. I still have fond memories of it! Your kids will remember this forever. I share your parenting philosophy as well, which I know a lot of people don’t get. Thanks for such a comprehensive post. Our yard doesn’t have enough flat land for something this elaborate, but some of the small ones may work.
Calling my landscape person right now to see if I can get the pebble moat (minus castle) added to our plan. We already had a boulder since that was our son’s one request – well that and an orange tree. Thanks!!
IT IS INSANE TO SEE WHAT THE BACKYARD LOOKED LIKE BEFORE AND HOW MUCH YOU’VE BROUGHT TO IT! Even though you’ve added a lot, spatially it looks bigger, plus it’s way more functional.
If you have the money to hire out task when you are so busy, don’t feel bad about it. You are sharing the wealth and providing work. It’s a win win !!!
This is absolutely beautiful! And even though the flags were super pricey, they totally make it look like an English castle! This makes me want to build something special for our tot now!
That is SO COOL! Lucky ducky kids! Also, love the pebbles and boulder, not as messy as sand I imagine and more fun to dig in and climb around. Great job!!!
I’m from LA and raising my son in NYC, and suffering from some SERIOUS home sickness when I see this yard and castly. Especially when I think of the warm summer nights in LA…what a dream for your kids!
You have just totally killed your new space dead. I really love everything about your new home–the interior, that patio!, and now this. You’ve done such a good job making design decisions in such a short amount of time. Very inspirational!
This is such a beautiful and unique post,Emily!
Love, love, love. It’s a win, win, win( those include your friends and kids!)
So well done all around. I hope these kids will look back one day and see how amazing and magical their childhood was and how much their parents cared.
Emily, this turned out so great! I have been waiting to see the final reveal of your playhouse and it was worth waiting for. What a wonderful play space you have created for your children! I appreciate you mentioning about the pebbles and giant boulders. I have been worried after seeing an early picture of the boulders underneath the slide, but it looks like you did a fabulous job of moving them all away and now the kids can just play on them and stay safe. Great job!
I loooove this and wish I had it as a kid! Another homerun, Emily.
Also, I have a question for you parents out there and I’m totally serious — are those boulders truly scary to some parents? HOW? and WHY? (Aren’t they like, one foot tall?) I don’t have kids yet but my husband and I plan to in the next 1-2 years and I’m truly afraid that I’m missing some parental-safety-awareness chip. I come from a very outdoorsy and adventurous family (so I esp. love Brian and Emily’s approach!), and it wouldn’t have even occurred to me that those boulders are dangerous in any way!
JR, I think the fear comes from how litigious our culture is these days. Most newly built public playgrounds have spongy foam surfaces around the play structures and gone are the high slides, long chained swings, typical jungle gyms, and teeter totters. Children fall. They get bruises and break bones. Public places must protect themselves from being sued and I think it leads some parents to seeing all play spaces (including natural outdoor features) through that lens. I am very lenient about climbing and exploring compared to my friends and it has paid off in confident kids who have a growing sense of their physical limits.
Also, becoming a mother awakens a sense of fear in many of us! I have an outsized fear of my child choking!
In my mind the danger is not from falling off one of the boulders, but hitting your head on one coming off the slide or drawbridge – which is why them moved most of them to the back, I think.
You aren’t missing a chip; things you don’t see as dangers without kids look completely different once your own child is near them. Those boulders don’t worry me but they’d freak out my son’s father, who is SUPER worried about everything. I’m more of the “let him explore and fall” parent and think he’ll be better off trying, failing, and learning from his mistakes and boo-boo’s than from having a childhood without risk and injury.
its weird but most dads are far more terrified than moms. Brian was brave about boulders but not about other things. Meanwhile I see every fall as a success unless they are in the emergency room (which is the phrase that especially terrifies Brian:))
That’s f!@#$%^ awesome, Emily!!
I’ve been looking forward to this post so much, I have multiple screenshots saved on my phone from your Insta stories of the progress on the castle. I am totally going to use the plans you posted in the blog… thank you so much for including them! One question on the ramp, its not on the plan… you mentioned that they had to figure out how best to make it so the babes could get up and down safely. Do you know how long they made the ramp?
Also, do you have a plan for protecting the castle during bad weather? I’m up in the Bay Area, so lots of good weather and not tons of rain, but it does rain (fingers crossed) in the winter, are you at all worried about the wood warping or rotting? Is that what the stain is for?
Thanks for always being so transparent through your process. I’ve been a reader for a loooong time (at least 5 years), and your candidness, honestly and personality (along with your style) is why I keep coming back!
My husband is a carpenter and he built some outdoor tables out of pine for a local restaurant once. If you’re really great about sealing them with poly (sadly, the good chemical-laden stuff), they should be ok. I would use pressure-treated lumber on posts that are in the ground though… which I know is controversial for some parents/people to help stave off some of the rot (you have to let it “dry” out if you use treated wood though). So… it’s doable but takes maintenance and ideally would last longer if covered in bad weather too (as most things do!)
Your comment about the superman cape not being pinterest worthy made me laugh out loud. Even though your life can seem pinterest-perfect at times, comments like these show you don’t take yourself too seriously and keep you human and relatable. I would say the same for your posts where you share your design mistakes – you can’t know how much those mean to me because as someone who has made many expensive mistakes, it helps knowing that even professionals don’t always get it perfect first or second try. Keep up the good work – the castle looks great! I would have been one who would have voted for the sandbox since its my boys all time favorite thing we have in our yard, but the pebble pit looks pretty fun, too.
Thank you. Your comment is MUCH appreciated 🙂 xx
I’d want to make it big enough for me. I’d stock it with bookshelves and soft comfy place to sit and read. I might need a fridge to hold cold drinks and emergency supplies of ice cream. And cookies. Must have cookies. And a tin can “telephone” so I can call my friends in their play castle next door. And a telescope to look at stars at night.
Custom flag not required (saving more $$$ for cookies and ice cream). I’m thoughtful like that.
PS I could make a pinterest worthy pirate flag, I have in the past for my grandson back when he was into the pirate thing. And hunting for pirate treasure. I used to kidnap his stuffed animals and hide them then he’d have to follow clues all over the house and yard to find them … and the pirate’s treasure. Grandpa played One eyed Jack, the evil sneaky pirate.
There may have been homemade cookie bribes to get One eyed Jack to hand over the first clue.
Not a mom and I live in the city but THIS IS SO COOL! I love seeing stuff like this, even if, for someone with my lifestyle, this would be “aspirational,” haha! I can only look at so many posts on “budget-priced, apartment-sized sectionals” from other bloggers before I’m bored to tears. Your content the past year+ has been amazing, as is your new house. Dont let some crazy people who are living in the past sway your direction. Growth is a good thing – good for you for being able to afford your life.
Wow. THANK YOU. These comments seriously keep me going. xx
This looks amazing! We had a similar climbing tower when my boys were little and they played with it for years. One idea from a local park that kids played with for hours is to rig a bucket on a pulley from the ground to the castle. Watched kids play filling the bucket with pebbles etc., and hauling it up and down. (I literally mean hours!)
This idea is genius!
This is so fabulous!!! You hit all the required points for kid-approval: a space of their own, climbable with inherent “danger,” aesthetically pleasing (yes, children notice), open-ended play, and unique. Thank you for including so many details. We have considered something similar for our backyard but haven’t pulled the trigger.
Also, it doesn’t rain in the summer in LA? Ever? No thunderstorms? I’m having trouble wrapping my head around this.
It does but its sealed, but well get the stuff out before it rains… 🙂
I love this–thanks! Can’t wait for the landscape post!
Now that I’m aware of the photoshopping that takes place to eliminate distracting elements, I find the changing background of the neighboring house’s yard behind the castle to be pretty hilarious. Also educational: I’ve begun using photoshop to try to improve my own snapshots in similar ways! 🙂
Ha. there is no photoshopping behind there … not sure what you are talking about 🙂 We painted the fence, is that what you are referring to?
Oh, Emily! I’ve been a fan for years & years & am so embarrassed that the comment of mine that you responded to after all this time is an idiotic comment that I was just now looking up to see if I could delete when I noticed that you had responded to it…. *red-faced emoji* I had previously noticed that behind the painted fence that there was blue sky, a lone palm tree, or a banana tree or else lots of branches. However, it was just the different angles…. I read your blog twice a day, every day & am a huge fan of your blog & your writing. And as the case with many of your fans, you & your blog have influenced my own writing & photography as much as my eye for design & decorating. I’ve also really loved your posts related to what you look for in an assistant, a resume, & other insider or job-related tips. I’ve sent some to my nieces & they’ve appreciated them so much & have become fans as well! (However, some of the wonderful old posts don’t seem to be accessible anymore.) Some comments from readers that might come across… Read more »
OMG, YES! Can we buy the plans so we can built this ourselves (following the cut-plans, of course)? Thanks
YES! I mea, you dont’ have to buy it, hopefully those plans help 🙂 xx
I have been so looking forward to this post! Awesome, awesome, awesome. ALMOST makes me wish for toddlerhood again. (My girls are 5 and 9 now.) I bet you have discovered by now that no matter what the final cost this was WORTH IT. We have a Costco playhouse that I wish was this cute (blasted city lot here so it’s all that would fit) that the kids have spent years and years and years in. Totally makes parenting easier and it makes the kids so darn happy. Again, well done.
Thank you:) Always nice to hear from a fellow parent that its not a waste of money 🙂
Love love love! But why pebbles over sand? Whoever mows your lawn is going to hate you. Pebbles will be flying everywhere. My kids loved their sand. My son spent hours making rivers and mountains and roads and tunnels in it. He had a hose too.